
Author Archive
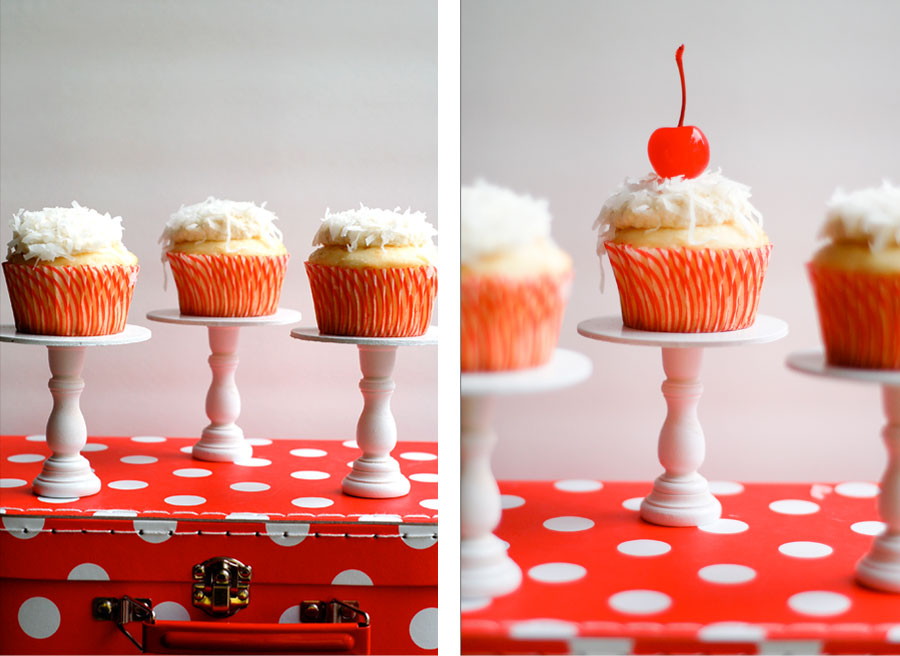
If you saw my post on Emerson’s First Birthday Party, you may have noticed the super cute mini cupcake stands. I am totally obsessed with anything cupcake. I mean it, ANYTHING! I had seen several other stands that I loved, but that were way too expensive. So, I decided to make my own! Personally, I think they are equally as cute, but I am bias!
As promised, here are the super-duper-quick-and-easy instructions so you can make them too! You will need the following supplies:
1. Mini 3″ Candle Sticks made by Lara Crafts $2.99 for a set of 4 2. 3.25″ Wooden Unfinished Circles $0.29 ea. at JoAnn’s Craft Store 3. Wood Glue (I’m sure any brand will do), My Hubby already had some in the garage 4. Spray Paint (pick a color, any color), Rust-Oleum from Home Depot $3.44 a can
**Cupcakes are optional**
I purchased the Mini Candle Sticks online from New Image Group. They carry this brand of wood at Michael’s and other craft stores, but my local Michael’s didn’t carry this particular item. Take one candle stick and one circle. With a little wood glue, place it around the rim of the candle stick and adhere the circle in the center. I just eyeballed them. I am sure you could take the time to measure them, but I didn’t think that was necessary. Let them dry for 24 hours before you handle them. I’d like to note that I’ve dropped mine several times and they are all still in tackt. That wood glue is some serious stuff! Jessica proof anyways 🙂
Now, I spray painted mine. And when I say I, I mean my nice husband, Lincoln. I didn’t want to take the time to brush all 20 of them, but I am sure you could use craft paint on them if you prefer that method. Lincoln did approximately four coats on these. He used just over one can of spray paint. They are fairly covered. There are a few areas that could use some extra paint, but I think it made them look a little distressed and that was perfect for Emerson’s party. Let them dry and enjoy!
Seriously, that’s it. So, for just over $1 each, I made 20 adorable cupcake stands. You could adorn them with ribbon, add some fancy paint job, vinyl the tops, etc. Run with it. . . I’d love to see what you create.
Please let me know if you have any questions!
Our little Emerson is one TODAY! Happy Birthday to you little man. If you’d like to take a journey back in time and read all about his birth, click here.
Here’s a look at how we celebrated Emerson’s birthday this past weekend. I always hate it when my babies get older. I think first birthdays are always hard on mamas.
Thankfully, I’ve been thinking about Emerson’s birthday for awhile. You may recall the post I did with his inspiration board. I’ve been bookmarking any ideas using Delicious . (If you haven’t heard of Delicious, it’s an awesome tool to store your bookmarks. Delicious is a free service that allows you to login and access your bookmarks from any computer. You can also organize, search, and share your bookmarks. I encourage you to try it out. NOTE: This was not a paid advertisement. Your current programming will continue now).
I knew I wanted to do a vintage style first birthday party. Since Emerson is our third son, I feel like I have to be a bit more creative. We’ve already done many of the “traditional” party themes. Emerson’s birthday invite was the first piece that set the ton for the card. I created a vintage heavily distressed book invitation complete with a removable book slip cover. Courtney, from Courtney Jade Photography took the amazing photos of Emerson and was kind enough to blog about his invitations. If you’d like to see more photos of his invites visit Courtney’s post.
I booked the party at Gymboree Play and Music. It was so fun and the staff was amazing. We had help from Lauren and Sarah (staff at Gymboreee) running the party and cleaning up. They both really helped to ease my mind and were willing to pitch in when and where ever I needed them! Thank you guys! (Check out my fashionable pink cast too!)
I literally brought in my whole house for Emerson’s party. I had a ton of help though. My Mom and sisters, Kellie and Jamie, came early to help me set up the dessert table. Thank you guys for supporting me and putting up with my craziness. Since I broke my arm in early November, I really took it easy. I “made” many things that just required some extra chocolate or assembly. I got a ton of ideas from the Hostess Blog. It continues to be a place I visit for inspiration. One of the items that was a huge hit was the Candy Cane Mint Milanos. They were so easy to make. Emphasis on easy! Hostess Blog has great decorating ideas too. I love these picture frames that were used as signs at one of the parties that was featured.
Okay, so without further ado, here is Emerson’s Dessert Table.
A few of my favorite things were these adorable polka dot suitcases. I purchased them all the way from Australia from Retro Bird Designs. I also loved the little picture frames I saw on Hostess Blog that I purchased at Ikea for only $0.99 each. I used them all throughout the party. Aren’t they cute?
I went with a “Milk and Cookies” theme for the dessert table. I created an assortment of cookies, most of which I didn’t even have to bake. It was so easy and quick. Who knew if you just added chocolate to pre-made cookies it made them taste better and look prettier?
Do you remember the business veture I was getting into with my sisters, Lovedrunk Designs? Let’s just say we haven’t had any time to work on our new business very much. I did some practice screen printing for the party though. I gave each of the kids their own screen printed muslin bag with their name on it. I also made some extra bags with the words “thank you” on it.
Continuing on with the cookie theme I made Oatmeal Chocolate Chip Cookies and sewed them in glassine bags that I purchased from Garnish. I also bought these super cute wooden forks there too.
One of my favorite items were the mini glass bottles and retro stripe straws! We filled them with chocolate milk and they were just the perfect size for little ones. These really added that little something “extra.” Don’t even ask me what lengths I had to go to to track these bottles down. Oh well, it was all worth it and I will have them forever.
I am planning on doing a quick tutorial on the little cupcake stands that I made for each kid. For now, you will just have to check out the photos. These were super easy to make too and I am in LOVE with how cute they are. Check back tomorrow for a diy tutorial.
Don’t you love them? If you know me at all, you know I love cupcakes. I always make cupcakes. My favorite flavor is banana. For Emerson’s party, I made both banana and coconut. I’m still partial to banana though!
I didn’t want the kids to have to carry all of their goodies so I purchased little polka dot gable boxes to put all of the party favors in. I made little “library cards” to clip on the boxes so each kid had a label on their own box. With so many kids, I think over labeling their items is the best way to go.
Here are some additional photos you may enjoy.
I will do a follow up post on the little cupcake stands with instructions and a list of supplies you will need. If you have any questions, let me know. I’d be happy to share all of my secrets with you for a price 🙂 Just kidding. Ask away!
Happy Birthday Emerson!
**I’d like to give a special thank you to my husband for putting up with me through all of this party planning. He spray painted the cute cupcake stands for me too. Thank you honey! I’d also like to thank my dear friend, Laura for being there to bounce ideas off of and to helping me design the dessert table. Though she couldn’t be at the party she helped me assemble Emerson’s invites and she also helped me set a “dry-run” of the table. You’ll never know how much I appreciate your constant support! Thank you!**
It’s true. I BROKE my arm. I am blogging with one hand. Yes, typing with one hand. You try it, it’s not very easy! This couldn’t have happened at a worst time. As you all know, I am planning Emerson’s birthday party, working on Skyler’s party, and am in my full swing of Christmas card orders. Sure! I am super women. I can do everything that I always do with a broken arm too, right? WRONG!!! I am totally struggling with my uber-fashionable-black full arm cast! You heard it right, FULL ARM CAST!
Well, despite my broken arm, it doesn’t change the fact that Emerson is going to be one soon. Party planning must go on! The universe doesn’t care if I have two good arms or not. I must push forward. Thankfully, I was thinking ahead and had Emerson’s first birthday photos taken early! I am friends with the most adorable, kind, talented women who is the sole photographer for Courtney Jade Photography. She took the most adorable photos of Emerson for his birthday invitation. I could not have been happier. Though, I’m sure she thought I was a bit crazy!! Hey, it’s true!
When I met Courtney, she was so excited to take Emerson’s photos. She put both of us at ease and was a miracle worker. I mean it. Taking good pictures of little kids is a miracle!! Check out these photos. You’ll die!
He looks like such a little man, doesn’t he. Oh, I’m already sad and he’s not even ONE yet! Time goes by way too fast {sniffle sniffle}.
He loved his cake too. He was double fisting it!! That’s my boy!
Here are a few more of my favorites. I just had to share.
Too cute in his tie
Courtney was kind enough to meet me the next day with the photos beautifully packaged. I’m sure she doesn’t want me broadcasting that, but I am totally type A and couldn’t wait another minute to get the photos in my hot little hands. She politely obliged me and I couldn’t have been happier!
I already had Emerson’s first birthday card mocked up and got to work. Thankfully, because it just so happens that I finished Emerson’s invites and broke my arm that same night. It just goes to show you that you can never be too prepared! You never know what the universe is going to throw at you!
I had to send Courtney the finished invite because it wouldn’t have been the same without her amazing photos. She made my night tonight. She actually blogged about my invite (okay, so it’s Emerson’s invite, but I designed it)! I don’t think anyone as ever said so many nice things about me. I seriously started crying. Thank you Courtney for the most beautiful blog post. I am seriously honored! Check out her post and Emerson’s invitation on Courtney’s blog.
** It was Courtney’s amazing idea to add the “vol. 1” on the cover. It was seriously, the perfect addition! Thank you for your wonderful suggestion!**
If you are in need of an amazing photographer, go check out Courtney Jade Photography! Also, “like” her on facebook too! Believe me, I’ve worked with many photographers and Courtney has to be one or the best photographers I’ve ever worked with and she’s absolutely adorable to boot! Thank you again for helping me make Emerson’s Birthday so Special! I
You can say it. I’m crazy! Say it again if it makes you feel better, I’m crazy! I’m starting a new business {again}! This time though, I am not alone. My sisters Jamie and Kellie are going to be helping me. We are going to be working together to create custom screen printed items from party favor bags to t-shirts and everything in between. Aren’t you excited? I know I am!
We are just in the very beginning stages of our business, but first things first. Every business needs a good name, right? Once I came up with the idea, we had a name not more than 12 hours later. We went round and round with names. Nothing really good though. We wanted something unique and memeroable. I love names that stick in your head like Spoonflower and Potterybarn. They are both two common objects, but that you would not typically associate with one another.
Then, the name just came to us. I was sitting on the couch nursing Emerson and he stopped nursing. He was a bit loopy and happy looking. Jamie said, “Look, he’s love drunk.” She had meant “milk drunk,” but love drunk came out. I said, “That’s it! Love drunk designs.” We texted Kellie and she liked it too. Business name, check. What’s next. . . you guessed it! A logo!
Any successful business starts with good branding, right? You know how I am always harping about that. I think it’s true though! Whenever I do logo designs I always design three totally different concepts. I sketched these out on paper. I can’t draw at all either! Someday, I will show you my sketches! Thankfully, I am a little better with the computer. Here are the three sketches I came up with.
I know they are all in black and white. That was done purposely! Every logo should also look good in black and white. Which one is your favorite? Why? What colors would you use? I thought it would be fun to share this process with you.
Sincerely,
The Craziest Mom on the Block!